TL;DR
Moving your rig into a closet can drastically reduce noise and reflections, but proper ventilation and placement matter. Combining acoustic treatment with good airflow makes a tiny space both quiet and cool.
Imagine your noisy AI rig quietly humming away behind a closet door, while your workspace stays silent and focused. It’s not just a dream—it’s a practical, affordable way to manage sound in small spaces. The secret isn’t only about foam or blankets; it’s about where you place your rig and how you handle airflow. When you understand these basics, you can turn a cramped closet into a surprisingly effective studio or workstation.
This guide will show you how to turn that tiny space into a sound-quiet, heat-managed haven. You’ll learn the best placement strategies, how to treat reflections, and, most importantly, how to keep your rig cool without opening a floodgate of noise or heat. Ready to make your closet your secret weapon for a clean, silent setup?
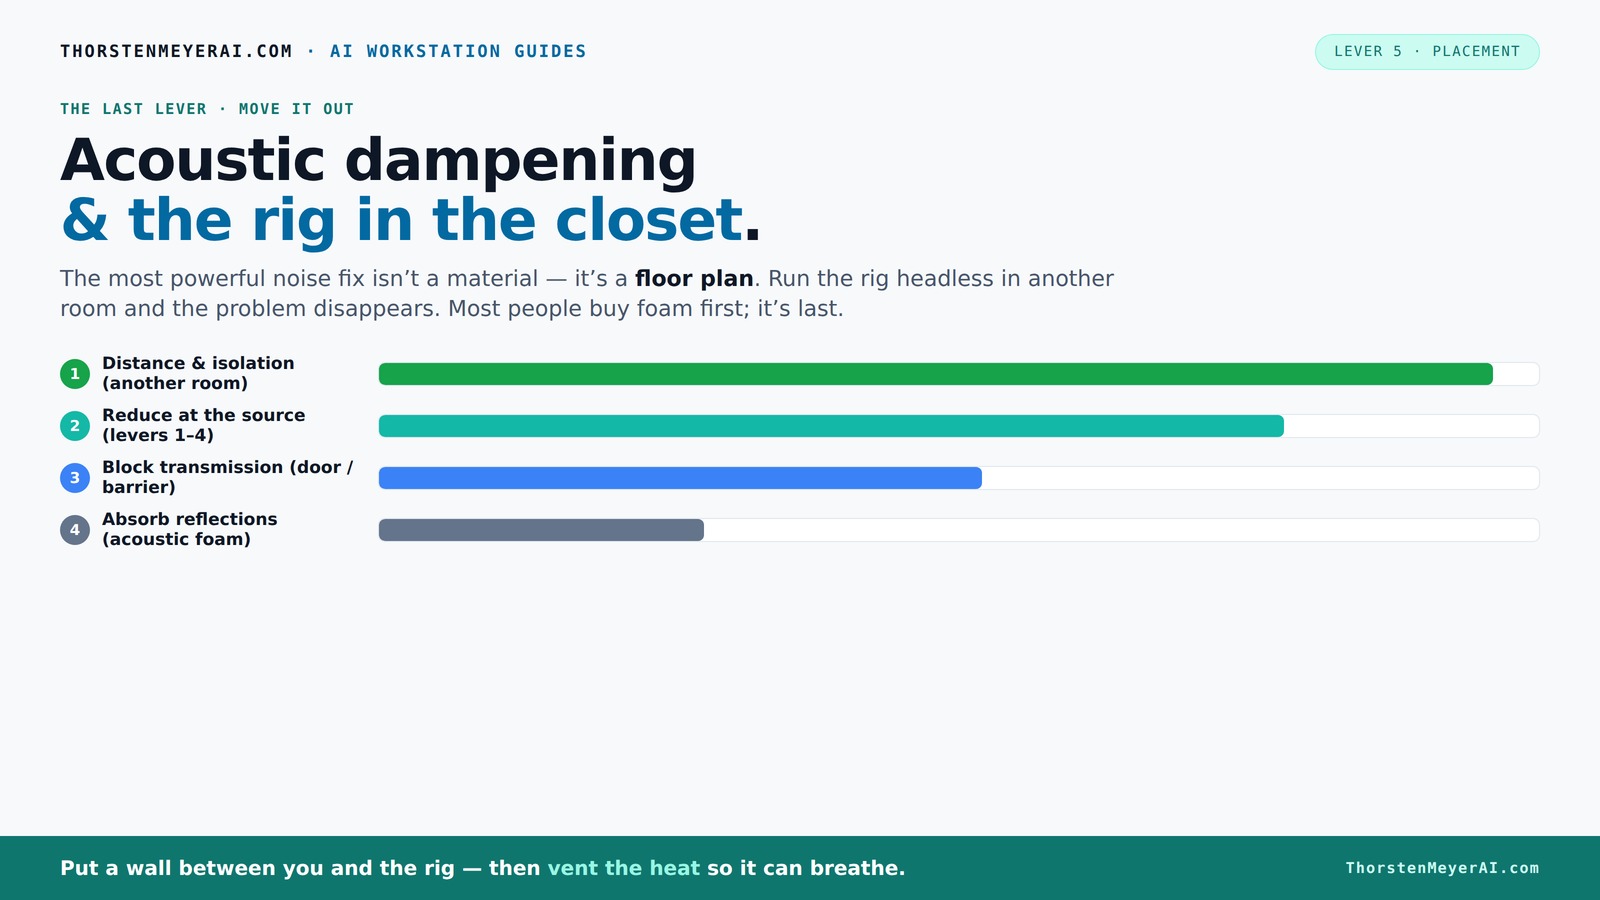
Acoustic dampening
& the rig in the closet.
The most powerful noise fix isn’t a material — it’s a floor plan. A rig you can’t hear because it’s in another room beats any amount of foam. Tap the approaches in Part 1 to see what actually works.
(another room)
(levers 1–4)
(door / barrier)
(acoustic foam)
Contain the noise, not the heat
Key Takeaways
- Always prioritize placement—distance and orientation matter more than foam for noise reduction.
- Proper ventilation is non-negotiable—without airflow, heat will ruin your setup and make noise worse.
- Treat the biggest reflection surfaces first—walls, ceiling, desk—to improve clarity.
- Seal gaps around doors and vents to block sound leaks without sacrificing airflow.
- Use a combination of acoustic treatment, strategic mic placement, and proper cooling for a balanced closet setup.

36 Pack AUSLET Acoustic Panels 12 x 12 x 2 Inches, Pyramid Sound Proof Foam Panels for Wall, High Density Black Acoustic Foam Panels,Soundproof Wall Panels
- Enhances Sound Quality: Absorbs noise, echoes, and reverb
- Quick Expansion: Fast to expand and regain shape
- Unique Pyramid Design: Provides effective sound control
As an affiliate, we earn on qualifying purchases.
As an affiliate, we earn on qualifying purchases.
Why Placement Matters More Than Foam for a Quiet Rig
The first move is simple but often overlooked: where you put your rig makes a huge difference. If you keep it on your desk or right next to you, noise and heat are constant problems. But if you place it in a closet or room behind a wall, you cut down on sound transmission and heat buildup from the start.
Think of your rig as a noisy, hot neighbor. Moving it into a closet with a door—preferably with ventilation—acts like a noise buffer. Plus, it keeps the heat away from your workspace. For example, a user in a small office found that shifting their GPU tower into a closet reduced the noise heard at their desk by over 80%, simply by creating physical distance [4].
The key is to run network cables or Wi-Fi, so you can control your rig remotely. This way, you don’t need to sit next to a loud machine. It’s a game-changer for noise-sensitive setups or if you want to keep your space clutter-free.
Beyond just reducing noise, proper placement affects heat dissipation. Keeping your rig in a confined space without ventilation can cause temperatures to spike, risking hardware failure or thermal throttling, which in turn can make fans ramp up and generate more noise. Therefore, thoughtful placement combined with strategic ventilation is essential to balance quiet operation with hardware safety. It’s a tradeoff: you want the rig out of sight and sound but not so enclosed that it overheats. Finding that middle ground ensures your setup remains both quiet and reliable.
How to Ventilate a Closet Rig Without Making It Louder
Placing a hot, powerful machine inside a sealed closet might sound perfect for noise reduction, but it’s a trap. Without proper airflow, heat quickly builds up, causing your rig to throttle and fans to scream, defeating the purpose.
Here’s how to do it right:
- Install passive vents or duct openings to allow natural airflow. These vents should be positioned strategically—top and bottom—to promote convection, where hot air rises and cooler air replaces it.
- Add a quiet, thermostatically controlled exhaust fan—something like a low-noise PC fan or duct fan that kicks in only when needed. This minimizes noise during idle periods but provides active cooling when temperatures rise.
- Use ducting to direct hot air outside or into a ventilation shaft, ensuring heat is expelled away from your workspace.
- Consider an active cooling solution like an AIO radiator that can expel heat externally, which can be very effective in small enclosures.
Proper ventilation isn’t just about cooling—it’s about managing airflow to prevent heat buildup that causes fans to work harder and generate more noise. Well-designed passive and active ventilation strategies can keep your rig cool without introducing additional noise. This balance means your setup remains silent during idle times and stays cool under load, avoiding thermal throttling and excessive fan noise, which are common tradeoffs in small, enclosed spaces.
The Most Effective Acoustic Treatment Strategy for Small Closets
Acoustic dampening isn’t just about slapping foam everywhere. It’s about treating the biggest reflection points and minimizing low-frequency buildup. In a tiny closet, reflections bounce off walls, ceiling, and even the door, creating muffled or boxy vocals.
Start with these steps:
- Identify the reflection points — behind the mic, the wall facing the sound source, the ceiling, and the desk surface. Understanding where reflections bounce helps target treatment for maximum clarity.
- Use thick acoustic foam or bass traps at corners to tame low frequencies. Bass traps absorb the energy of low-end sound waves that tend to accumulate in corners, preventing boominess and muddiness.
- Place soft materials like blankets or rugs on surfaces that reflect sound back into the mic. These materials absorb high frequencies and reduce echo, making recordings clearer.
- Seal gaps around the door with weatherstripping or acoustic sealant to prevent sound leaks, which can reintroduce reflections and reduce overall effectiveness.
Effective treatment isn’t just about adding foam; it’s about understanding how sound interacts within the space. Properly addressing reflection points and bass buildup ensures your recordings are clear and natural, avoiding the common pitfalls of a dead-sounding or overly muffled environment. Strategic placement of absorption materials allows you to fine-tune the room’s acoustics, resulting in a balanced, professional sound in even the tiniest closet.
How to Block Sound Leaks in a Tiny Closet Without Sacrificing Airflow
Blocking sound leaks isn’t just about stuffing blankets—it's about sealing gaps and creating a barrier. The closet door is usually the main weak spot. Weatherstripping, acoustic door seals, or even a heavy curtain can make a big difference. For more detailed tips, see this guide on acoustic sealing.
Here’s a quick way to block leaks:
- Apply weatherstripping around the door frame to seal gaps where sound can escape. This prevents leaks and helps contain noise inside.
- Use a door sweep at the bottom to seal gaps between the door and the threshold, further reducing sound transmission.
- If possible, add an acoustic blanket or foam panel over the door for extra damping. This adds mass and absorption, significantly reducing sound leaks.
- For ventilation, incorporate a sealed vent with a muffled exhaust fan or ducted airflow to prevent sound leaks while keeping the air fresh. The key is to design a vent that allows airflow but minimizes sound escape, such as using sound baffles or mufflers. the ducting.
This approach balances soundproofing with airflow. Sealing leaks reduces the noise that escapes into your environment, but if you ignore ventilation, your rig can overheat. Combining soundproofing measures with controlled, muffled airflow ensures your setup stays cool and quiet. Properly sealed vents and acoustic treatments over the door maintain the integrity of the soundproofing without sacrificing the necessary airflow for heat dissipation, thus addressing both noise and thermal concerns effectively.
Budget vs. Pro: How Much Do You Need to Spend on Closet Soundproofing?
Getting a quiet closet setup can range from budget hacks to professional-grade solutions. Knowing where to invest makes a big difference.
Here’s a quick comparison:
Budget Approach Pro Approach Blankets, rugs, DIY foam panels Acoustic panels, bass traps, sealed soundproof cabinet Basic ventilation with a small duct fan Custom soundproof enclosure with active airflow and temperature control Minimal sealing, focus on reflection reduction Full sealing, weatherstripping, and professional acoustic treatment Understanding the tradeoffs helps you allocate your budget effectively. Budget solutions like blankets and DIY panels are excellent for reducing reflections and muffling noise, but they may not address low-frequency buildup or provide airtight sealing. This can result in residual sound leaks and less effective noise isolation. On the other hand, professional solutions—such as sealed, soundproof enclosures with dedicated ventilation—offer superior noise reduction and temperature stability but come with higher costs and installation complexity. Choosing between these options depends on your priorities: if silence is critical for professional recording, investing in quality treatments and ventilation is worthwhile. For casual use, budget approaches can be surprisingly effective, especially when combined with strategic placement and sealing. Ultimately, understanding these tradeoffs allows you to tailor your investment to your specific needs and budget constraints, ensuring you get the best value without compromising your goals.
Handling Low Frequencies & Standing Waves in Tiny Spaces
Small closets often develop bass issues—boomy, muffled sounds that ruin vocal clarity. This is because low frequencies bounce around and create standing waves. These standing waves cause certain spots in the room to have exaggerated bass or nulls, leading to inconsistent sound and muddled vocals. The fix? Target those problem spots with thick, dense absorption or bass traps, especially in corners where bass tends to accumulate. Bass traps absorb the energy of low-end sound waves, preventing them from reflecting repeatedly and causing muddiness. Placing them strategically in corners or along walls facing the sound source reduces low-end buildup by over 60%, according to soundproofing experts. Additionally, using thicker, denser panels on walls facing the mic can tame muddled lows. Remember, addressing only the reflection points isn’t enough; addressing the room’s bass response is key to avoiding that “boxy” sound. Proper bass management results in clearer, more natural recordings and a more balanced sound profile, especially critical in tight spaces where low frequencies tend to dominate and distort the overall clarity.
Mic Choice & Placement Tips for a Tiny Closet
In a small, reflective space, mic choice can make or break your sound. Dynamic mics tend to reject room noise better and are less sensitive to reflections, making them ideal for small, untreated spaces. Condenser mics, while more sensitive and detailed, can pick up more room reflections, which may require additional treatment or positioning to mitigate. Placement is equally critical: Position the mic close to your mouth—about 6-12 inches—to reduce the pickup of room reflections and unwanted noise. Angling the mic slightly downward or away from reflective surfaces minimizes the amount of sound bouncing into the capsule. Using a shock mount and a pop filter improves clarity by reducing handling noise and plosive sounds. Experimentation is key—sometimes moving the mic just a few inches can dramatically change the sound, reducing echo and muddiness. For example, a voice-over artist found that switching to a dynamic mic and placing it closer to their mouth eliminated echo and muffling, even before adding treatment. It’s about combining smart mic choice with strategic placement to maximize clarity in a small, reflective environment.
DIY Tricks & Common Mistakes to Avoid in a Closet Setup
Building a closet studio isn’t about just tossing blankets or foam around. It’s about targeted, strategic treatment. Overusing foam without sealing gaps or ignoring heat management creates problems rather than solutions. Common mistakes include over-treating with foam, which can deaden the sound excessively, making the audio unnatural. Not sealing gaps around the door or vents allows sound leaks that compromise the entire setup’s effectiveness. Ignoring heat buildup—failing to ventilate or manage airflow—can lead to equipment overheating, reducing lifespan and increasing fan noise. Failing to treat low frequencies can result in boomy vocals, which are hard to fix later. Instead, focus on reflection points, seal leaks, and manage airflow. Low-cost DIY methods like using thick blankets over reflective surfaces or adding homemade bass traps can work wonders, but only if you avoid these pitfalls. Proper planning and understanding of acoustics and heat management are essential for creating an effective, quiet, and safe closet studio.
Frequently Asked Questions
Is a closet booth soundproof or just sound-treated?
A closet booth mainly reduces reflections and echoes—it's sound-treated. True soundproofing requires sealing gaps, adding mass, and controlling airflow, which is more complex and costly.Where should I place the mic in a closet?
Place the mic close to your mouth, about 6-12 inches away, and angle it slightly downward or away from reflective surfaces. This minimizes room reflections and captures clearer sound.Do I need bass traps in a small closet?
Yes. Low frequencies tend to build up in small, enclosed spaces, causing boomy vocals. Bass traps in corners or thicker panels on walls facing the mic help tame these lows.How do I stop sound from leaking through the door?
Seal gaps with weatherstripping, add a heavy acoustic curtain, or install an acoustic door seal. Combining these with ducted ventilation prevents leaks while keeping the space cool.What’s the best way to avoid boxy or boomy vocals?
Treat reflection points, add bass traps, and use a directional mic placed close to your mouth. Proper placement and treatment reduce echo and low-end muddiness, making vocals crisp.Conclusion
Turning a closet into a quiet, cool studio or AI rig space is entirely doable with smart placement, thoughtful treatment, and ventilation. The best setup balances sound reduction with heat management, so your equipment runs smoothly and your recordings stay clear.
Remember: the most effective noise solution is distance. If your rig lives behind a door, you’re already halfway there. Focus on sealing leaks, treating reflections, and ensuring good airflow, and your closet can become your secret weapon for pristine sound and quiet operation.